Equipment needed
-Good quality microfibers
-Hairdryer (I wouldn't recommend a heat gun. More below.)
-Red "sharpie" permanent market
-Woolite brand detergent
-Small awl
-Glue gun
-Philips screwdriver
-Time
Here is a few pics of my tired armrest. It was in a state. Almost leather-like and the stitching was more pink than red.


Badge had seen better days.


First step is to remove badge. I used a dremel with the heavy duty cut-off wheel. My goal was to cut just enough to get the stupid clips off without damaging the plastic underneath. A steady hand is required here.


I used a thin flathead screwdriver and needle nose pliers to carefully pry the clips off.


Voila!

New badge

dismantling the old and new badge takes patience. I cannot stress that enough, PATIENCE. To remove the clear plastic cover I used 2 butter knives to carefully pry one side at a time. That's the easy part. Removing the actual emblem is a bit tougher. The two silver holes on the back of the badge are alignment holes for the actual emblem. The emblem is held down by thin two sided tape. I used a heat gun and a small awl for this but in hindsight I should have used a hairdryer. The heat gun puts out way too much heat and it was hard to control the temperature of the plastic. You can use it but be aware that the plastic will more than likely warp even on low setting. What you are doing is heating up the emblem just enough that the 2 sided tape becomes "tacky" and the emblem can be removed without bending it. My process was heating the emblem a little and carefully push the silver pins on the back evenly using the small awl. I pushed from the back because I didn't want to damage the front. It took me about 10 cycles to get them apart. This took the most time as I was paranoid about bending it. READ: TAKE IT SLOW. I'll probably burr the blank one down the road but I want to keep this original badge because well, it's the original badge.


Now it's all apart, I gave a nice wipedown with a microfiber. I didn't want to put it together only to find dust trapped underneath and have to take it apart all over again. I used the thinnest 2 sided tape I could find.

Toughest part complete. You might notice a bit of wear on the edges of the emblem. I cleaned up what I could. It's a little bothersome but it'll do for now. Anyways, I think it looks a million times better and I do have the blank one...or three


Now on to the armrest. I used Woolite, hot water and 3 or 4 microfibers to clean it up. I dampened a microfiber with hot water and then sprayed a mixture of Woolite/hot water on the armrest. I believe I used 6 parts water to 1 part woolite. Gently rubbing my microfiber I immediately started lifting up the years of dirt and grime. Rinse and wring out well often. I did this probably 15-20 times. I used the solution sparingly because the dirt was coming up so easily. It wasn't soaking wet so it dried within a few hours. I've read some people use a suede brush but mine felt and looked brand new so why spend money unnecessarily. I bought a couple of permanent red sharpies from Staples for a couple of bucks. I used the side of the marker to lightly brush the top of the stitching. I found it soaked in perfectly without touching the alcantara. It took 4 coats to get the perfect red, 2-3 minutes between coats. Yours may require more or less. When you are satisfied it's time to reattach the badge. Now the new badges come with new clips BUT I plan on removing this at least one more time in the future so I didn't use those stupid clips. Instead I used a bit of hot glue on the three pegs.

And the finished product.


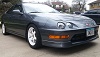
Installed

I probably put 3 hours of time into it (not including drying time) and I'm pretty pleased with the results. Hopefully this helps anybody who's looking to attempt this. Feedback or comments are welcome. Cheers