Awesome build.
I'm also doing meth injection good to hear you've not run into heat issues, that was one of my biggest concerns. Also great to hear the stock internals handling 8 psi without issue I was nervous about that.
Due to CARB and need to register the out of state shell yet, I'll have to run the off the shelf pulleys until I'm all cleared then will figure out if I want to upgrade the stepper pulley or the one on the charger itself. I have a stepper pulley on hand but I've heard that doing the smaller charger pulley can help with belt slip since the belt will wrap further around the pulley once tightened.
Very exciting to hear a very similar build to my vision has been run successfully long term! I can't wait to get running and compare notes. Thanks so much for posting.
fyi I'm on IG too same username mostly a rehash of what's posted here.
Dumb, Stubborn, and bound to end up penniless…….
Re: Dumb, Stubborn, and bound to end up penniless…….
I hear you can probably get past smog or whatever by forcing the bypass to stay open during testing? I haven't checked IG in a while I will after work.
Honda-Tech: aka Ultraspeed DC2
ITR Expo 8 & 16 attendee
1998 #729
IG: NOCSUCOW
ITR Expo 8 & 16 attendee
1998 #729
IG: NOCSUCOW
Re: Dumb, Stubborn, and bound to end up penniless…….
Bypass seems to be the go to solution (generally considered more reliable than the original Jackson FMU) and maybe down the road that's the route I'll go but it's basically risking your motor on faith a zip tie will hold the bypass open. If the bypass shuts while running 8psi on an OEM setup you'll go lean pretty quickly. The idea of taking that risk to do enough driving to clear ready test scares me a bit too much to mess with at the moment.
Dumb, Stubborn, and bound to end up penniless…….
Had a total freak-out today.
Wrapped up the intake, popped the distributor on, and slid the axles in. Great day right?
For some reason I could pop through the gears with out disengaging the clutch still. I confirmed both hubs/rotors would spin if I put it in gear and manually turned a rotor but the motor wasn’t moving as if the clutch wasn’t engaged at all. I manually spun the motor, the hubs did spin but hub would stay where held with out any real effort the motor would still turn. Dropped the clutch slave to verify that there was no pressure on the clutch. Same result and total freak out!
Started thinking I need to drop the trans and figure out a new clutch.
The idea that some how the limited slip differential and/or lack of trans fluid was somehow related to the issues nagged at me though.
One last test to run so I put the wheels on, made sure it was in gear and parking brake was on, then put it on the ground. Tried to spin the motor and as if by magic it would roll a little but as soon as I let pressure off it rolled back. The clutch was engaged! Tried to change gears and now it wasn’t going anywhere without the clutch disengaged. Remounted the clutch slave and confirmed with the pedal down the clutch was free. All good, panic over. Guess I still have a lot to learn. Lol


Re: Dumb, Stubborn, and bound to end up penniless…….
is that just a mock up for the fresh air part of intake, or will you be doing a smooth pipe & proper bracket?
I wish I was making as much progress but time is my enemy. Randomly a buddy of mine came by yesterday and asked what would be my magic number for my car, I told him $17.5K running, rolling, unpainted. When get on the forums and I see cars like yours on the brink of enjoyment, I have second thoughts. Wish I had more wrench time. Keep up the great work man.
I wish I was making as much progress but time is my enemy. Randomly a buddy of mine came by yesterday and asked what would be my magic number for my car, I told him $17.5K running, rolling, unpainted. When get on the forums and I see cars like yours on the brink of enjoyment, I have second thoughts. Wish I had more wrench time. Keep up the great work man.
Re: Dumb, Stubborn, and bound to end up penniless…….
The intake feed definitely looks janky it's what I had in the LS build. But it's proven to work well for me(the build dyno'd 213whp), installation\removal is a breeze, and it's not visible. We'll see if the same holds true for the build with JRSC. I could complicate it but what's the marginal advantage for something you can't see?
If flow is a significant issue, with the vented hood likely to keep bay temps closer to ambient, I'll probably just pop the top of the air box and let it pull from the bay directly. Another option for max performance (since this only matters on the track) would be to pull the air box\filter and just leave the CT velocity stack attached to the arm. All it would take is pulling (4) Phillips screws for the cover and filter clamp, and another (3) 10mm bolts holding the air box down. It's a very flexible\modular setup and that's what I like the most about it.
Re: Dumb, Stubborn, and bound to end up penniless…….
What are the bags/cloth over the shocks?
-Andrew Wong
Re: Dumb, Stubborn, and bound to end up penniless…….
Spring bags, basically fabric dust covers to help keep keep dirt out of the damper seals.
Dumb, Stubborn, and bound to end up penniless…….
No photos to share for this update but back to making some more progress:
Valve lash adjustment done twice: once to OEM spec. then redone to proper .007/.008 spec. for my Skunk2 tuner 1 cams.
It seemed like a good time to drop the spark plugs in. My JRSC kit came with a box of BKR7E which are generally recommended for FI. I re-gapped them to .34. Should work to at least to get me running.
The JRSC pressure switch had been bugging me with pink ring terminals right up top, and I still needed to do final install for it with thread sealant. I decided to shrink tube the ring terminals and add a disconnect (Deutsch 2p) so it looked more professional so now it’s all wrapped up and sealed.
The power steering system was closed up except for the return hose to the reservoir, which I had left off for access to flush the system. I left the reservoir connected to the pump but moved it between the radiator and header, left it tilted to the side and attached a spare hose to the return inlet to make sure it couldn’t spill out if I filled too much. Then I added fluid to the reservoir up to the return inlet. I connected a mitivac pump to the open end of the PS return hose and started pulling suction. Seemed like it took about 5psi to draw fluid from the reservoir and I just took it slow filling the reservoir as I went until I got fluid coming out the return line. With some rags down I disconnected the vacuum pump, slipped the return hose onto the reservoir, and topped it up. When I start the car up I’ll finish bleeding (basically just turning the wheels with it sitting on the ground) and do a final top up.
Brake fluid also went in. It went pretty easily with a check valve bleeder setup. Followed the Helms pattern FL, FR, RR, RL. Took about 10 pumps for front lines and about 15 for rear. Seemed to hold about 600ml of ATE 200 (Mugen front calipers, Stock ITR rear). Pedal is still soft at this point so I’ll need to re-bleed but since it was an entirely empty system and new master cylinder I expected it to need a few rounds to clear it out well.
I think (motor) oil will be next, I still need to drop the oil temp sensor in first to seal the oil pan and that means I should put some effort into that wiring. I’m still debating if I want to do trans. fluid through the speed sensor like I have in the past and just go by spec. volume or try to level out the car and do the official process. I’ll probably just go by volume. I’ve actually heard that it’s beneficial to add quite a bit more than what’s called for so if I’m a little over I doubt it would cause any issue. Coolant I’ll probably save for just prior to first start if all goes well then I can bleed right then. Need to check through all the OEM wiring and make sure everything is connected up properly and that there’s no open leads.
It’s conceivable 1st start could be this weekend.
Dumb, Stubborn, and bound to end up penniless…….
https://vimeo.com/391736387
Ran into an issue pretty quick though. Not sure how I missed it but PO hacked up the fan switch connector, only one wire was actually connected to the switch. Shorted the switch wires and confirmed the fan turns on. I’ll need to do some quick wiring but not a major issue.
The best news is no Mil on the oem (immo. bypassed) ecu!
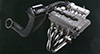
And yes the dent in the Comptech intake needs to be pulled
Ran into an issue pretty quick though. Not sure how I missed it but PO hacked up the fan switch connector, only one wire was actually connected to the switch. Shorted the switch wires and confirmed the fan turns on. I’ll need to do some quick wiring but not a major issue.
The best news is no Mil on the oem (immo. bypassed) ecu!
And yes the dent in the Comptech intake needs to be pulled
Last edited by aklackner on Sat Feb 15, 2020 6:05 pm, edited 1 time in total.
Who is online
Users browsing this forum: No registered users and 1 guest